links:

ProgramsHome.com

VaySoft Image to EXE Converter

Are you struggling to copyright protection of your Image product? VaySoft Image to EXE Converter can help you.

VaySoft Image to EXE Converter is an application that will help you convert image files to self-running EXE file. The EXE file can be copied to any computer and will run on Windows 2000, XP, 2003 Server ,Vista, Windows 7.

VaySoft Image to EXE Converter support most common image formats, such as: JPG to EXE, JPEG to EXE, BMP to EXE, TIFF to EXE, PNG to EXE, GIF to EXE.

VaySoft Image to EXE Converter support mouse drag&drop to adjust images order.

VaySoft Image to EXE Converter can help you generate Personalized output exe file. For example you can set private icon images for output exe file and configure your picture images before or after playing the Image. The image support not only JPG, BMP,EMF but also PNG and GIF file, so, you can make your own irregular or animated welcome interface.

VaySoft Image to EXE Converter encrypt the original Image file, the output EXE files get theimage data through memory stream, so your users cannot get it in his/her computer hard disk, This feature will strongly protect your images, it can prevent users from getting the original image files.

VaySoft Image to EXE Converter has registration feature, only permitted person can view the images. When the output EXE runs for the first time, a dialogbox will popup to ask for the registration key. If key is correct, EXE will continue to open the presentation. Otherwise, EXE cannot open the images.

VaySoft Image to EXE Converter can set play time limit, you can set various time expiry for your image files.

VaySoft Image to EXE Converter can set string or image waterkark.

.VaySoft Image to EXE Converter can set normal viewer background color and silde show background color.

The output image exe is similar with Windows Picture and Fax Viewer with additional good features and most of them are customizable, your users need not any train to run it. These are main features:
• Scroll through the images in the folder.
• ncrease or decrease the image preview size.
• View the image in full size or as the best fit for your window.
• Manage image files and print, save, delete, or change file details.
• View a slide show of all your images, or select the set of images you'd like to view in a slide show.
• Open the image in an editing program if you wish. Note that this closes Windows Picture and Fax Viewer.
• Rotate images right or left by 90 degrees.
• Play a MP3 sound
• Save image to hard disk with annotation and watermark or not.
• Can annotate while viewing images.


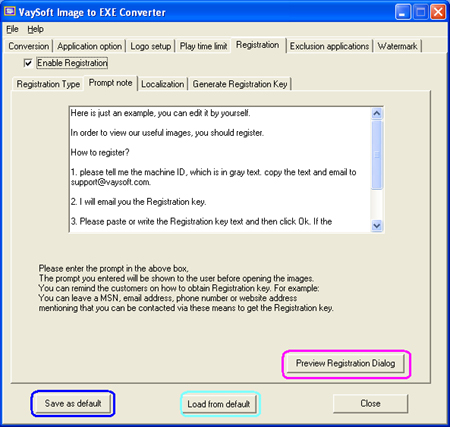
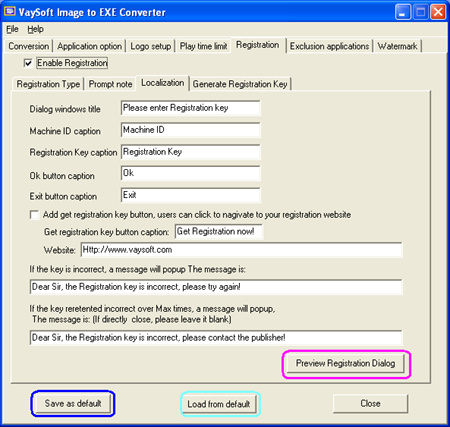
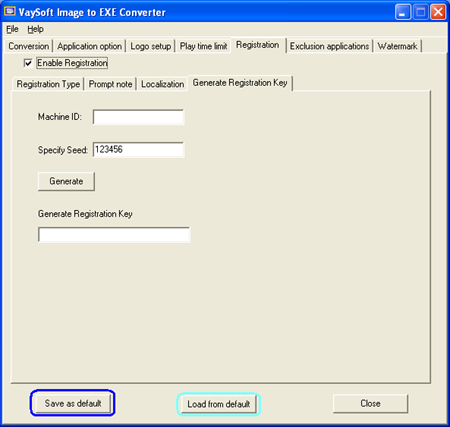
FAQ:

How to set the registration key for the output EXE file?

How to generate the registration key?


How to set the registration key for the output EXE file?

Step 1

Reference the picture on the right.

1) Select the “Registration” bar and then click the left side checkbox of “Enable Registration”.

2) Select “Registration Type” bar.

3) If you want to set different registration key for different computer.

● Click the left side checkbox with the red circle mark.

● Fill numbers or letters as you like in “Special Seed”, and remember them, you will use them again when you generate the registration key for your users.

3) If you want to set the same registration key for every computer.

● Click the left side box with the green circle mark.

● Fill numbers or letters as registration key in “Registration key”.

4) Edit “Registration other option” with the yellow circle mark, you can edit them easily.

Tips:

1. you can priview the registration dialog by click the button with the pink circle.

2. after you finish the set, you can click the button "save as default" to save the set as default.

   when you want to set the same registration type, click the button "load from default", the saved type will load.

Step 2

Reference the picture on the right.

Select “Prompt note” bar, edit the prompt message in the box of registration.

Tips:

1. you can preview the registration dialog by click the button with the pink circle.

2. after you finish the set , you can click the button "save as default" to save the set as default.

   when you want to set the same prompt note, click the button "load from default", the saved prompt note will load.

Step 3

Reference the picture on the right.

Select “Localization” bar, edit the items of the registration dialog.

Tips:

1. you can preview the registration dialog by click the button with the pink circle.

2. after you finish the set , you can click the button "save as default" to save the set as default.

  when you want to set the same registration dialog, click the button "load from default", the saved item sets will load.

How to generate the registration key?

Reference the picture on the right.

Select “generate registration key” bar.

1. copy or type the machine ID of the user.

2. type the "Special Seed" which you setted.

3. click the "Generate" button, a key will appear, copy the key and send it to your user.

Tips:

After you finish type the "Specify Seed", you can click the button "save as default" to save the set as default.

  when you want to set the same Seed, click the button "load from default", the saved Seed will load.


.


© 2006 - 2017 VaySoft Ltd. All rights reserved